-->
Showing posts with label grilled. Show all posts

Sunday, June 2, 2013

Grilled Corn with Gorgonzola, Apple, Chive Spread


9 years ago, Seth gave me a stuffed unicorn.  So soft and perfectly sized for hugging, it became necessary for sleeping.  Yes, I am aware that it is ridiculous to need a stuffed animal to sleep when you are approaching 30.

Max recently became attached to this unicorn.  And put his own spin on it, placing a sock on one and only one hoof.  It can now be found sporting an old tee-shirt of his - one featuring the solar system and a rocket ship - as well as a diaper.  You know, in case the unicorn has to go.

I guess I have to accept that it has become his.  Though now I am left without my own sleeping buddy (Seth - umm help please?).  And my sleep has been suffering as a result.

Instead of a unicorn, I can drown my sorrows in some corn on the cob.  Max's word for unicorn and corn are one and the same.  Both are referred to as "na."  And he apparently won't touch this "na."  So this is my "na."  And the unicorn is his.  If only the corn could be used as my stuffed animal.  Then everyone would be happy.

Ingredients
4-8 ears of corn

For the spread:
1/2 cup mayonnaise
2 tablespoons sour cream
1 tablespoon grated Granny Smith apple
1/4 cup Gorgonzola cheese
1 teaspoon ground toasted hazelnuts
1 teaspoon lemon juice
lots of fresh snipped chives - for both the spread and for sprinkling on the corn

Instructions
Grill corn using favorite method.  For this batch, we brushed olive oil over the corn, wrapped it in its own husk, and placed on the grill.  Once the corn was mostly cooked (Popping a kernel produces juices), we unwrapped it and placed directly on grates to get a little char.  In the past, we've grilled the corn directly on the grates exclusively (medium to medium high heat).

In a small bowl, stir together the mayonnaise, sour cream, grated apple, Gorgonzola, ground hazelnuts, and lemon juice.  Refrigerate until serving.  Before using, stir in a liberal amount of snipped chives and use remaining as garnish.


Sunday, May 19, 2013

Grilled Artichoke Quarters with Anchovy Garlic Drizzle - a Picnic Potluck


I am a ruiner.  As in, I ruin things.  Usually with just a few well-placed complaints.  It can be seen as a talent.  Or a buzzkill.  All depends on your perspective.

I'm starting to think I might need to keep this tendency in check.  Just a bit.  Okay, maybe a lot a bit.

For instance, we got some Chinese takeout recently.  And ate it on a table outdoors at sunset at this super scenic area.  It was gorgeous and romantic.

Until Seth asked me how I liked the food.  My response was ehhhh.

I mean, yes, I guess I was being truthful (the food wasn't bad, and some dishes were pretty interesting, but it could have been better), but the truth isn't always the most beautiful.  It won't always bring the most happiness.  Instead I was the person bringing the party down.  My complaining really served no purpose but to sap all the romance from the scene.  Would it have killed me to just say that I love it?

So I need to work on this whole complaining thing.  Just a little.


This month's Creative Cooking Challenge comes at the perfect time.  The topic is, "potluck picnic."  And picnics, being all outdoors and stuff, can be a bit of a bugaboo.  Wonderful in theory, but a goldmine for complaints about bugs, food that shouldn't be cold, food that shouldn't be warm, etc.

That said, we are preparing grilled artichoke quarters with an anchovy garlic drizzle. It may seem like a strange choice for a picnic, but if one does the prepping and boiling of the artichoke before arriving, as well as the mixing of the drizzle, one only needs to grill the quarters on site, and finish them with the drizzle, Parmesan and parsley.  Freshly grilled, they should be hot enough to melt the cheese and make up for the long trip.  And who doesn't like grilling at the park?  Plus the drizzle has a crazy amount of flavor.  Hopefully, they'll keep my whiny side in check...

Click here to check out the entire Picnic Potluck Roundup hosted by Joan of Foodalogue!


Ingredients
2 artichokes (will make 8 quarters)
2 ounces anchovies packed in olive oil, be sure to reserve the olive oil from the package
3 tablespoons olive oil
2 garlic cloves, minced
1 teaspoon white wine vinegar
1 teaspoon ground hazelnuts
Parmesan cheese wedge and microplane, for serving
parsley leaves, for serving

Instructions
For the anchovy drizzle (at home):
Pour the olive oil from the anchovies into a small pot.  Mince the anchovies and add those in.  Stir in 3 tablespoons olive oil, the minced garlic, and the vinegar.  Over low heat, let the mixture come together for 5-10 minutes, until the anchovies have begun to melt into the mixture a bit.  Take off heat and stir in the hazelnuts.

For the artichokes (at home):
Prep we will do at home.  To start, set a large pot of salted water on the stove to boil. Using kitchen shears, trim off pointy tips of artichoke leaves. Using a large, sharp knife, cut off the top ½-inch of the artichokes and the end of each stem. Carefully remove any small leaves attached directly to the stem. Wash artichokes thoroughly under cold water to clean them off, and dry with paper towel.

For this part, you will want to do one artichoke at a time. Take your big sharp knife, coat it with lemon juice from one of your lemon wedges, turn an artichoke upside down, so the stem is sticking up and slice it straight down in half, and then in half again to make quarters. Immediately rub down all cut surfaces with lemon wedges to prevent discoloration. Take a serrated spoon, or regular spoon, and coat it with lemon juice. Scoop out the fuzzy choke in the center, as well as the inner, purple leaves. Make sure you get all of the fuzzy part out, and liberally rub down the top of the heart with lemon to prevent discoloration. I also try to cut any remaining prickly points off of the inner curled leaves to prevent poking the eater. Repeat for other quarters.

Once water is boiling, place artichokes in, cut side down, and cover with a clean cheese cloth, dish cloth, or cloth napkin. This will soak up water and ensure the artichokes stay wet while cooking. Cover pot with lid and cook about 9 minutes. When they are ready, they should be just soft enough to push a fork into the inside of the stem, but no softer. The outside of the stem should still be a bit firm.  Carefully remove artichokes and place in a bowl of ice water to halt their cooking.  Once they have cooled, thoroughly drain the water out and place in a Tupperware container to bring to the grill site.

For the artichokes (at grill site):
If using a charcoal grill, stack and light charcoal according to your favorite method. We like using a large chimney starter. The charcoal will be flaming and smoking for around 20-45 minutes.  Once 90 percent of the charcoal is ashed over, spread evenly onto charcoal rack, and place grates.  After grates have warmed up (5 minutes), scrape them clean using a grill brush.

Once your grill is ready to use, brush the artichokes with olive oil and black pepper. Adjust heat to high (350-400°). If grill grates are cast iron, rub them down briefly using a few paper towels or a cheese cloth dipped in canola oil. Place artichokes on grates, cut side down. To help them stay oriented correctly, squeeze the quarters up next to each other for added support. Close top and wait 3-5 minutes. Once the side making contact is adequately charred, brush the remaining cut side with olive oil and turn over onto the un-charred side.  Remove from heat once both cut sides have a light char.

Drizzle the artichokes with anchovy mixture, then sprinkle with fresh grated Parmesan cheese and chopped parsley.

Thursday, January 17, 2013

Creative Cooking Crew: Vegan Challenge - Mixed Mushroom Yakitori and Mushroom Scallion Potstickers


This is our inaugural month with the Creative Cooking Crew (hosted by Laz of Lazaro Cooks and Joan of Foodalogue)! Doesn't "inaugural" have a nice ring to it?  Just like the President being sworn in on Sunday, this feels a little bit like a swearing in for us, and we are super pumped.

This month's challenge had a vegan theme  -"Choose one of your favorite rich, heavy, fatty animal-protein based meals and give it a healthy VEGAN spin.”


When we heard "vegan," our minds immediately translated that to "MUSHROOMS!" Lots and lots of mushrooms.  So many mushrooms were purchased that the cashier at the market appeared concerned.  He asked "why would we need so many mushrooms, are you making mushroom stew?" We said no - panfried dumplings and teriyaki mushroom skewers.  He asked us if we were serving that with a side of mushrooms. I was irrationally amused by that image.

In my defense, I wasn't sure how many mushrooms to get (after all, things happen and extras are always good!).  We ended up having so many leftover mushrooms from the challenge that I was able to make both a beef stroganoff and a pesto pasta dish with them.  So I guess the cashier's initial concern at the volume of mushrooms making their way down the conveyor belt was well-founded.

We chose to mushroom-ize two meaty dishes that make us crazy for their umami, savory deliciousness.  Two dishes that when placed in front of us, turn us into uncivilized primates, attacking the pile of food with gusto, and never speaking a word to each other until the task of eating has been completed.  Only then will conversation and civilized behavior resume.  These meaty grilled pops basted in teriyaki sauce are one of those dishes.  Here, we swapped the thinly sliced beef for a mix of mushrooms - King Oyster, shiitake, and cremini, and we added pineapple chunks and slices of jalapeno for additional flavor.   Pork and scallion potstickers are another of these dishes.  Dipping panfried, pork and scallion flavored dumplings into spicy, garlicky, soy-vinegar sauce brings us joy.  Utter joy.  So we turned our meaty friends into vegan versions using mushrooms in the filling.  I would just like to point out that I intended to use oyster sauce in the dumpling filling.  But at that very crucial period of time right before dumping some in, I realized that this was not a vegan sauce.  Which now is obvious.  But then, not so much.  So I threw in some tea instead.  

As it happens, we were almost forced to actually turn the mountain of mushrooms into stew - as rain started tricking ever so lightly on the grill.  But somehow, this rain stayed at a gentle drizzle for just a few minutes then stopped, only to resume again once we were done grilling.  Which was lucky, or we would have missed out on some pretty amazing skewers.  The teriyaki mushrooms made us just as deliriously excited/primal as their beefy counterparts.  The mushroom potstickers are good on their own, but don't really taste anything like the pork-based originals.  All in all, a fun experiment that yielded some yummy dishes we may never have tried out otherwise.  So happy "Inauguration Day!"  To us, and the president...  in three days...  And thanks to Creative Cooking Crew for the opportunity to try something new!

P.S. Check out all the great work done by the Creative Cooking Crew team here.


Mixed Mushroom Yakitori


Ingredients
2/3 cup mirin
1 cup soy sauce
4 teaspoons rice vinegar
1 teaspoon sesame oil
¼ cup brown sugar
7 cloves garlic, minced
1 tablespoon minced ginger
1 tablespoon minced jalapeno pepper
1 inch strip of orange peel

king oyster mushrooms (we used about 4 oz of each kind of mushroom)
shiitake mushrooms
cremini mushrooms
pineapple chunks (about 1 cup of fresh pineapple chunks)
jalapeno slices (we used about 1 jalapeno)
1 tablespoon cornstarch

1 tablespoon water
10-15 bamboo or wooden skewers
5 tablespoons canola oil (for grilling)
chopped scallions, for serving
rice, for serving

Instructions
Place the mirin in a medium pot and boil over high heat. Reduce to medium low and add the soy sauce, rice vinegar, sesame oil, brown sugar, garlic, ginger, jalapeno, and orange peel. Simmer for 20 minutes. In a small bowl, whisk the cornstarch with water. Bring the sauce to a boil and thicken with the cornstarch mixture, constantly stirring. Let the sauce cook for 5 more minutes, tasting to make sure the cornstarch has fully dissolved. Once ready, pour into small bowl and set aside.

Take bamboo or wooden skewers and soak in cool water for 30 minutes.

Preheat grill to high (roughly 400°). Just before grilling, take mushrooms, pineapples, and jalapeno slices and thread onto skewers. You want equal parts of each type of mushroom on each one.  Brush canola oil onto both sides of mushrooms, pineapples and jalapenos.  Place canola oil in a small bowl. Using a paper towel or cloth, dip in canola oil and rub over hot grates to prevent sticking. Lay skewers over heat and stay nearby to monitor. Once bottom is a little charred, brush the tops with canola oil, and flip. Brush again with thickened teriyaki sauce. Once the bottoms are slightly charred again, flip and brush with thickened teriyaki sauce, so both sides are sauced. Remove and top with freshly chopped scallions. Serve with rice.


Mushroom and Scallion Potstickers


For the dough:
We made our own dough from Andrea Nguyen's book Asian Dumplings, but you could just use store-bought wrappers

Ingredients
For the filling:
4 cups chopped cremini mushrooms
4 chopped scallions
5 cloves garlic, minced
1 teaspoon ground dried mushrooms (run some dried mushrooms through a spice grinder)
1/2 teaspoon kosher salt
1/8 teaspoon white pepper
2 tablespoons soy sauce
1/4 cup brewed Darjeeling tea
3/4 teaspoon apple cider vinegar
1 tablespoon sesame oil
1 tablespoon canola oil
1/4 teaspoon truffle oil
dash of liquid smoke
ground cinnamon, for serving

For the dipping sauce:
2 tablespoons soy sauce
1/4 teaspoon sesame oil
1 1/2 tablespoons white wine vinegar
1/4 teaspoon chile oil
1/2 teaspoon sugar
1 tablespoon water
1 garlic clove, sliced
1 chopped scallion
sesame seeds sprinkled on top

Instructions
For the potsticker filling:
Mix the mushrooms, scallions, and garlic in large bowl.  In a small bowl, stir dried mushrooms, salt, pepper, soy sauce, tea, vinegar, oils, and liquid smoke.  Pour over the mushroom mixture and stir.  Let the filling sit for 30 minutes to blend the flavors together.  Take a potsticker wrapper and place a tablespoon of the mushroom mixture in the middle.  After sitting, the mixture will be pretty liquidy, so use a slotted spoon to get the mushroom mix out.  Too much liquid in the wrapper will make them difficult to stay shut.  Close the wrapper into a half moon shape, then press a side down on a lined baking sheet, so that it now has three sides and can stay upright.  Repeat, until filling is used up.

To pan fry, place skillet over high heat, and pour a few tablespoons of canola oil in.  Once heated, place potstickers in, flat side down, and let sizzle for a minute or so until you can see the bottoms turning brown.  Reduce heat to low, pour in about 1/4 cup water, and immediately cover with lid.  Once water is almost all cooked off, and sizzling can be heard again, remove lid, and carefully flip dumplings onto one side.  Once that side has browned, flip them onto other side and brown.  Remove, place onto paper towel, and sprinkle cinnamon over top.

For the dipping sauce:
Mix everything together in a small bowl, and serve with the potstickers.

Sunday, September 30, 2012

Melt In Your Mouth, Grilled Teriyaki Wagyu Beef Sliders


This story will break your heart.  Shatter it.  Into millions of pieces.  I'm warning you.  I should probably just start penning a book called "Jenn's Super Sad Story."  Seth has been working nights and weekends (in addition to regular daytime hours). For months.  Then one glorious sunny Saturday, he decided to take a break and not go in for the day, just spend the day at home.  Even though I was feeling sluggish from not sleeping well and had a weird feeling in my throat, I was going to make the most of the day.  So we decided to do something low-key but fun - like grill!  We figured out what to grill, went out for lunch and afterwards obtained the necessary ingredients for our dinner.  And once all that happened, I realized I was sick.  Sore throat, headache, all that fun stuff.  So I helped make these sliders, but totally couldn't enjoy them the way they were meant to be enjoyed. Instead I savored some ice cream.  Since that never fails an ailing throat.  So that is the super sad story about how I was sick on the one day Seth was home and couldn't enjoy these sliders and "had" to eat ice cream instead.  I warned you that it would tug on your heartstrings in a profound way.  That said, Seth gave me some of this meat, fresh off the grill, and I can say it was absolutely melt-in-your-mouth amazing.  He insists they are the best sliders he's ever had, and still fresh in his mind a week later.  He even liked the pineapple on them!  And he hates pineapple!

Ingredients
2/3 cup mirin
1 cup soy sauce
4 teaspoons rice vinegar
1 teaspoon sesame oil
¼ cup brown sugar
7 cloves garlic, minced
1 tablespoon minced ginger
1 tablespoon minced jalapeno pepper
1 inch strip of orange peel

3/4 pound thinly sliced waygu beef
butter lettuce
Japanese cucumber, sliced
radish sprouts
Maui sweet onion, halved then sliced thinly
fresh pineapple slices, cored
scallions, chopped
jalapeno slices
Sriracha
mini kaiser rolls

Instructions
To make the teriyaki sauce:  Place the mirin in a medium pot and boil over high heat.  Reduce to medium low and add the soy sauce, rice vinegar, sesame oil, brown sugar, garlic, ginger, jalapeno, and orange peel.  Simmer for 20 minutes.  Refrigerate to cool.

Once the teriyaki sauce has cooled, marinate the beef.  Place the beef in a resealable bag and cover with the sauce.  Let it marinate for at least an hour in the refrigerator.

Preheat grill to high (roughly 400°).  Lay down grill-proof griddle and allow 3-4 minutes to preheat.  Working in batches, as necessary, place marinated beef on griddle and flatten out.  After 30 seconds to a minute, flip the meat and let cook for another 30 seconds to a minute before removing.  Both sides should be browned and only slightly charred.

Brush onion slices, pineapple slices, and cut sides of rolls with canola oil.  Place canola oil in a small bowl.  Using a paper towel or cloth, dip in canola oil and rub over hot grill grates to prevent sticking.  Grill the onions and pineapple on high heat until they have a light char on either side.  Place the rolls, cut side down, on the grates, and remove when lightly toasted.

To assemble the sliders:  Place a lettuce leaf on bottom slice of the bun.  Then layer cucumber slices, grilled pineapple, meat, grilled onions, jalapeno slices, scallions, radish sprouts, and top with a drizzle of Sriracha.

Sunday, June 10, 2012

Thinly Sliced Beef Yakitori


Plunging a stick in food was a genius idea – I sincerely wish we could thank the person who originally thought of doing that.  Think about hard candy.  If someone was like ohh, here have some candy and they handed you hard candy you would be like um thanks? But get a stick in that hard candy and it becomes fun!  You would totally be happy if someone gave you a lollipop.  Take a corn dog...  If possible, Seth would probably divorce me and marry the person who came up with that.  Take the stick out of the cornbread encrusted hotdog, and he would be like ehhh, ok.  But once that stick is there it is all like, ohh my god must have it.  Here, we take fresh beef flap meat, marinate it in a homemade teriyaki sauce, skewer it, then grill it over high heat, brushing it with a thickened version of the marinade.  Like eating a popsicle, but all meaty and umami.  And you know, grilled.  And not frozen.  Actually the opposite.  

Ingredients 
2/3 cup mirin
1 cup soy sauce
4 teaspoons rice vinegar
1 teaspoon sesame oil
¼ cup brown sugar
7 cloves garlic, minced
1 tablespoon minced ginger
1 tablespoon minced jalapeno pepper
1 inch strip of orange peel
1 pound flap steak, thinly sliced across the grain
1 tablespoon cornstarch
1 tablespoon water
10-15 bamboo or wooden skewers
5 tablespoons canola oil (for grilling)
rice, for serving

Instructions
Place the mirin in a medium pot and boil over high heat.  Reduce to medium low and add the soy sauce, rice vinegar, sesame oil, brown sugar, garlic, ginger, jalapeno, and orange peel.  Simmer for 20 minutes.  Place half of sauce in a Ziploc bag or container and refrigerate until cool. 

Take thinly sliced beef flap steak and cut into 1½-2 inch strips for skewering.  Submerge in cooled marinade and refrigerate for at least another hour.  Take bamboo or wooden  skewers and soak in cool water for 30 minutes.

In a small bowl, whisk the cornstarch with water.  Bring the remaining sauce to a boil and thicken with the cornstarch mixture, constantly stirring.  Let the sauce cook for 5 more minutes, tasting to make sure the cornstarch has fully dissolved.  Once ready, pour into small bowl and set aside.
 
Preheat grill to high (roughly 400°).  Just before grilling, take marinated beef and skewer so that the meat can lie flat.  Place canola oil in a small bowl.  Using a paper towel or cloth, dip in canola oil and rub over hot grates to prevent sticking.  Lay beef skewers over heat and stay nearby to monitor.  Once bottom is a little charred, brush the tops with canola oil, and flip.  Brush again with thickened teriyaki sauce.  Once the bottoms are slightly charred again, be careful not to overcook, flip and brush with thickened teriyaki sauce, so both sides are sauced.  Remove and garnish with toasted sesame seeds.  Serve with rice.

Thursday, June 7, 2012

Grilled Artichokes with Lime Aioli & Cotija Cheese


Today we were lucky enough to guest post on one of our favorite blogs, Lazaro Cooks!  We are super excited about it, because Lazaro is a truly fantastic and innovative food blogger.  His site, his cooking style, plating, and presentation are all top notch, and we agree with much of his perspective on cooking and food blogging in general.  We're honored to be included as guest contributors.  Here is a snippet from our post.  For the full post and recipe, head on over to our post on Lazaro Cooks

"We thought we would go ahead and celebrate one of our local, seasonal favorites by sharing this new recipe for Mexican-style grilled artichokes.  This recipe combines three things that we absolutely love – grilling (I mean, how can you resist that siren song of smoke, charcoal, fire, and cast iron grates), artichokes (we have a doormat decorated with artichokes and an artichoke-shaped candle, just to give you an idea of the depths of our love for this vegetable), and dipping (we are obsessed with foods that involve dipping; it’s such an active, communal way to eat)."

FULL RECIPE and post

Thursday, May 10, 2012

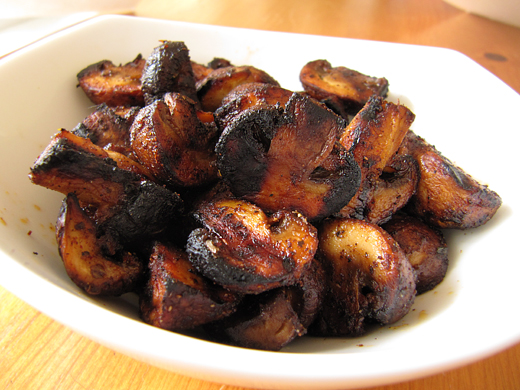
Grilled Mega-Spice Mushrooms


One of the best things in the world is grilling at night.  Something about the mix of the cool air, dark sky, and brightly lit, red hot charcoal is almost magical.  That scent of smoldering briquettes of wood wafting through the sweet air of the night – intoxicating! All those juxtapositions and contrasts makes the act of night grilling simply awesome.  These grilled mushrooms share the same sort of contrasts – sweet touches of cinnamon and sugar play off spicy cayenne and chile powders to make for a truly addicting appetizer.

Ingredients
Mega Spice Mix:
1 tablespoon kosher salt
1 tablespoon black pepper
2 ½ teaspoons garlic powder
1 ½ teaspoons onion powder
1 ½  teaspoons oregano
1 ½ teaspoons basil
¼ teaspoon cinnamon
3 tablespoons brown sugar
1 tablespoon smoked paprika
1 tablespoon paprika
2 teaspoons ancho chile powder
2 teaspoons cayenne
2 teaspoons New Mexico chile powder

Grilled Mushrooms:
8 ounces cremini mushrooms, halved
4 tablespoons canola oil
1 ½ tablespoons mega spice mix
1 bag charcoal of choice

Instructions
For the spice mix: Place all the seasonings in a bowl and mix together.  You will have leftover mix so keep in airtight container.

For the grilled mushrooms: Place the mushrooms in a medium-sized bowl.  Drizzle the canola oil and toss the oil with the mushrooms using tongs.  Sprinkle 1 ½ tablespoons mega spice mix, coating all the mushrooms evenly.  Set aside and prepare grill.

If using charcoal (highly recommended!), light charcoal according to package directions or using your favorite method.  We like to use a chimney starter, because no lighter fluid is required, and the coals will consistently light and burn down in around 30 minutes, regardless of wind conditions.  We get a lot of wind here, so it is very helpful!  Once 80-90 percent of the charcoal is ashed-over, spread them into a single layer, put cooking grates on, cover, and let the grates heat up for five minutes.  Adjust height of charcoal and air vents, if applicable to get a nice hot temperature (around 350-400 degrees).

If using gas grill, set temperature to high (350-400 degrees) and cover for 5 minutes to heat cooking grates.

Using a paper towel or dish rag, coat cooking grates with a thin layer of canola oil.  Try to not let it drip down onto the coals to prevent flare ups.  Place halved mushrooms on grill, cut side down.  Cover, and come back in about 2-3 minutes to check on them.  Once they’ve started to soften up just a bit, and the bottoms have a nice char, remove from grill and serve hot.

Wednesday, February 15, 2012

Grilled Chuck Burgers with Extra Sharp Cheddar and Lemon Garlic Aioli


These cheeseburgers have become our classic, standby recipe when we are just craving some juicy grilled beef.  Each component plays an integral role in the taste sensation - the meaty bite of beef, the intense sharpness of cheddar, the peppery arugula, the sweetness of grilled red onion, and creamy, lemony aioli to bring it all together.  We love this burger because it comes together rather easily when we have the sudden urge to fire up the grill.  We know it's not technically grilling season yet, but well... when you gotta have a burger, you gotta have a burger.  They're good all year round.

Ingredients  
1 pound ground chuck (enough for 4 burger patties)
½ tsp salt
½ tsp freshly ground black pepper
2 teaspoons Worcestershire sauce
8 ½ inch slices of a good extra-sharp cheddar cheese
4 honey wheat buns or Kaiser rolls
1 red onion, cut into ¼ -inch circular slices
1 tablespoon extra virgin olive oil
extra salt and freshly ground black pepper
arugula, for topping

Lemon Garlic Aioli:
¼ cup mayonnaise
1 teaspoon olive oil
1 teaspoon fresh lemon juice
1/8 cup chopped parsley
1 garlic clove, minced
salt and pepper, to taste

Instructions  
To prep the burgers:  In a medium bowl, toss in the ground meat, 1/2 teaspoon salt, 1/2 teaspoon pepper, and Worcestershire sauce.  Mix together with a fork.  Once the ingredients have been combined, form four patties.

To prep the red onion:  Brush extra virgin olive oil on both sides of all the slices and then sprinkle with some salt and pepper.

For the lemon garlic aioli:  In a small bowl, mix all the ingredients together.  Place back in refrigerator until burgers are cooked.

To cook:  Preheat grill to around 350.  If using cast iron grates, use a paper towel or cloth to wipe all grates with canola oil.  Place burger patties on grill.  Close lid and prep the buns by brushing canola oil on insides.  After a few minutes, check the patties.  If the bottom half looks just about cooked, roughly 3 minutes, flip over, and place cheese on top.  Add red onions and buns (cut side down).  Close lid.  After another 3 or so minutes, remove everything from grill.  The cheese won’t be completely melted, because of the thickness, but it’s okay, that’s the point ;-)  The cheese will stay extra sharp if the inside isn’t melted.  On the red onions, you’re looking for good char marks on one side, but the onion still a bit crunchy.  For the buns, you’re looking to get the bottoms nice and charred, but not so much as to make the bread tough.

To assemble the burger:  Place a handful of arugula leaves on the bottom slice of the bun.  Place burger with cheese slice on top.  Add the grilled red onions.  Slather the aioli liberally on the top half of the bun.

Sunday, January 29, 2012

Grilled Stuffed Jalapenos


Super Bowl Recipe #4:  We love grilling.  Something about that mix of hot fire, cast iron grates, and charcoal is absolutely intoxicating.  Here we grill spicy green jalapenos stuffed with a blend of extra sharp cheddar and Monterey Jack cheese and topped with a great smoky seasoning that ties it all together.  Until last weekend, we'd gone months without making these, and holy cow, they are even better than we remembered.  If you’re lucky enough to have grill weather this time of year, get out there and fire some of these up!  

Ingredients
8 jalapenos, halved, seeds and insides removed
1 cup finely grated extra sharp cheddar cheese
½ cup finely grated Monterey Jack cheese
¼ teaspoon cumin
¼ teaspoon coriander
¼ teaspoon smoked paprika
¼ teaspoon sea salt
¼ teaspoon freshly ground black pepper

Instructions
Mix together cheddar and Monterey Jack cheeses.  In a small bowl, mix cumin, coriander, smoked paprika, salt, and pepper.  Pack each jalapeno with some cheese mixture (amount will vary based on the size of jalapeno).  Sprinkle each with a dash of the seasoning mix. 

Heat grill to medium or medium high.  These jalapenos aren’t picky about temperature; any grill that is hot will do.  Place stuffed jalapenos on the grill, close cover, and grill until cheese is all melted, between 2 and 5 minutes.

Thursday, January 26, 2012

Tsunami Wings


Super Bowl Recipe #3:  This great alternative to the classic buffalo chicken wing will astonish you with its flavor and spice.  Essentially a joining together of garlic butter, lemon pepper, and cajun spices, it’s a combination that the local Cajun seafood places have used to attract foodies from all over southern California.  This is our recipe for this delicious sauce, only in honor of the upcoming Super Bowl, applied to chicken wings.  We like to grill the wings, because, well, grilled chicken wings taste awesome, and I like to play with fire.  Of course, you can easily fry, sauté, or bake your wings, and they’ll work just as well.

Ingredients 
1 ½ lbs chicken wings
½ cup unsalted butter
1 shallot, minced
7 cloves garlic, minced
1/8 teaspoon salt
1/8 teaspoon pepper
zest and juice from 1 lemon
2 tablespoons Spice Mix
1 1/8 cup chicken broth
4 green onions, chopped

Spice Mix:
1 teaspoon brown sugar
1 teaspoon smoked paprika
2 teaspoons paprika
2 teaspoons kosher salt
1 teaspoon onion powder
1 teaspoon garlic powder
1 teaspoon cayenne
¾ teaspoon white pepper
1 teaspoon freshly ground black pepper
½ teaspoon ground thyme
½ teaspoon oregano

Instructions
In a small bowl, mix the brown sugar and spices together.

Place chicken wings in a plastic bag with 1 cup chicken broth.  Let it marinate in the refrigerator for at least an hour.  In a large sauté pan, melt the butter over medium heat.  Sauté shallots until soft, about 8 minutes.  Add the garlic and sauté for a minute, until the garlic is fragrant.  Take off heat and add salt, pepper, lemon zest, lemon juice, 2 tablespoons Spice Mix, and chicken broth.  Any remaining Spicy Mix can be saved for another time.

If grilling, preheat grill to around 350 degrees.  Brush canola oil over grates, to prevent sticking, and immediately place chicken wings on grill and close the lid.  Come back in a few minutes to check; once the bottoms of the wings are nice and crispy, move them aside, brush a little more canola oil on grates, and flip them over.  Once both sides are a little crispy, put wings in a bowl and toss with your sauce.  Place them back on the grill for about a minute to let the sauce thicken and stick to the wings, and then remove from heat and toss again with more sauce.

Serve wings with chopped green onions sprinkled on top.

Sunday, October 2, 2011

Grilled Chicken Salad with Soy Vinaigrette


Hot off the grill, this chicken has a flavor that is powerfully umami. It is a classic recipe from Jenn's mom’s kitchen, and it is usually the last thing we’ll throw on the grill at night. It requires almost no effort to cook, and it’s a great way to stretch our cookout into the next day, when we’ll chop it up and mix it into a fresh salad. The balance of smokiness, spices, herbs, veggies, and soy vinaigrette makes this the one salad we look forward to. We like to use a lot of parsley in this dish to help complement the soy and red wine vinegar.

Ingredients
Grilled Chicken:
Marinate ½ – 1 lb of chicken breast in
½ cup soy sauce
¼ cup canola oil
¼ cup red wine vinegar
1 tsp oregano
½ tsp basil
½ tsp garlic powder
½ tsp parsley
¼ tsp ground pepper

Dressing:
¼ cup soy sauce
1/8 cup canola oil
¼ cup red wine vinegar
1 ½ tsp honey
¼ tsp Dijon mustard
splash of Franks red hot sauce
1/4 tsp pepper
¼ tsp oregano

Salad:
1 head iceberg lettuce, chopped
2 carrots, shaved
½ cucumber, sliced
2 scallions, chopped
1 cup parsley, chopped
¼ red onion, sliced
grilled chicken, sliced

Instructions
Marinate the chicken for at least 8 hours. Heat grill to medium high. Once hot, spread canola oil on grill grates, and place chicken down over the hot coals (or gas flame). Cook until one side has started to caramelize, and flip. Cook again until both sides are slightly charred. Remove from grill and chop into half-inch thick pieces. If you are refrigerating the meat for later, wait to chop until after you heat it back up.

In a large bowl, toss all salad ingredients.

In a small bowl, whisk all dressing ingredients until emulsified. Drizzle over the salad.