-->
Showing posts with label noodles. Show all posts

Monday, August 12, 2013

Sea Urchin Spaghetti Recipe

Sea urchin or uni is rich and creamy. It tastes very briny and yet sweet. Emulsified with some extra virgin olive oil and lemon juice, it makes a wonderful sauce for pasta. The type of pasta you use is up to you of course, but isn't it gorgeous on squid ink pasta? I love the look and flavor of squid ink pasta. It's such a treat! I got mine from Mattarello, a fresh pasta company run by John Pauley and his wife Anna.

I was a fan of John's pasta back when he was still cooking at Rex Cafe around the corner from my house. Now he sells his pasta at pop ups, generally at either Gourmet and More on Franklin or Biondivino wine shop on Green Street. His squid ink pasta is so good you can enjoy it with just a simple olive oil, garlic and white wine sauce with a little bit of chili flakes or parsley. He also sells lasagna, tortellini and some different shapes and styles of pasta, all made by hand.

This pasta is really a showstopper. I'd recommend serving it for a special occasion or dinner party. I adapted the recipe from one by Sara Jenkins I found in La Cucina Italiana, "spaghetti ai ricci di mare" but I simplified it a bit and didn't use any garlic.

Note: Another option is to make the sauce and top the pasta with another type of seafood instead of just more sea urchin. It's delicious with sautéed scallops or shrimp.


Sea Urchin Spaghetti
Serves 4 as a starter or 2 as a main course

Ingredients

About 4 ounces fresh sea urchin, divided
2 Tablespoons fresh lemon juice
1/4 cup extra-virgin olive oil
1/2 pound fresh pasta preferably squid ink spaghetti
2 Tablespoons chopped flat-leaf parsley
1 Tablespoon finely chopped chives

Instructions

Bring a large pot of salted water to a boil. Combine 2 1/2  ounces sea urchin and lemon juice in the blender, purée until smooth. With blender running, add oil in a slow and steady stream until you have a thick emulsified sauce, the texture of mayonnaise. Transfer the sauce and parsley to a large bowl.

Cook pasta until just al dente. Drain and place in the bowl with sauce and parsley, and toss together. Let pasta sit just until it absorbs some of the sauce, about 1 minute, then season with salt to taste. Portion pasta onto serving plates. Top with remaining uni and garnish with chives.

Enjoy!

Disclaimer: My thanks to Whole Foods for providing a sample of sea urchin for this recipe. 

Monday, March 11, 2013

Walnut Mushroom Casserole Recipe


When I was growing up, my parents took me and my sister to all kinds of restaurants but rarely ones with "kid's menus." We regularly came into San Francisco to eat Chinese food, tried sushi long before it became popular, and celebrated birthdays and school graduation at fancy French restaurants. Unlike many kids who probably longed for Taco Bell or McDonald’s, I enjoyed eating at  The Good Eartha casual restaurant near my houseThe menu had a mix of salads and sandwiches and some very unique entrees. It wouldn’t necessarily be considered “health food” by today’s standards but there were quite a number of vegetarian dishes. 

At The Good Earth, pretty much anyone could find something they would like to eat, and that made it perfect for dining out with everyone from my teenage girlfriends, to my grandmother. The Good Earth was famous for it’s spicy cinnamon tea which you can buy to this day. Although the restaurant chain was sold and very few restaurants remain, I remain haunted by the memory of Walnut Mushroom Casserole. It was my go to dish.

I like to think of myself as fairly adventurous, but really, when I find one dish I love, I have a hard time straying beyond it on any menu. The Walnut Mushroom Casserole at The Good Earth restaurant was my absolute favorite. It’s still on the menu at just one remaining restaurant in Southern California. Here is the dish description:

Walnut Mushroom Casserole spinach fettuccini tossed with broccoli, mushrooms, onion and water chestnuts, blended with sour cream and sherry sauce. topped with two cheeses, walnuts and scallions

I found a recipe online but it didn't seem right to me, so I adapted it as best I could to fit with my memory of it.  I used Al Dente spinach fettuccini and it was perfect. I also tested out Al Dente's bonachia spinach fettuccine, and that worked great too. Note: Do not overcook the pasta! 


Walnut Mushroom Casserole
Serves 6 

Ingredients

2 Tablespoons olive oil, divided
1 cup walnuts, coarsely chopped
1 medium onion, cut into quarters and thinly sliced
1/2 lb small button mushroom, halved or quartered into small chunks
3 cups thinly sliced broccoli, stems and bite-sized florets
8 ounce can sliced water chestnuts
1 clove garlic, minced 
2 Tablespoons sherry
2 Tablespoons soy sauce
1/2 cup + 2 Tablespoons sour cream
6 ounces dry spinach fettuccini (such as Al Dente brand), cooked until barely tender
1 cup shredded monterey jack cheese
1 cup shredded cheddar cheese

Instructions

Preheat oven to 375 degrees.

Heat a large skillet over low heat, add walnuts and stir until lightly toasted and fragrant, then remove and reserve the nuts and return the skillet to the stove.

Add one tablespoon oil to the hot skillet and the onions and mushrooms and cook until just beginning to brown, remove with a spoon and reserve. Add the remaining tablespoon of oil to the pan and the broccoli and sauté until crisp-tender, about 8 minutes. Stir in the reserved onions, mushrooms, water chestnuts, garlic and spinach fettuccini. Remove from heat and add the sherry, soy sauce and sour cream. Stir gently to coat without breaking the noodles

Place mixture in a greased, shallow 2 1/2 quart baking dish. Sprinkle evenly with the reserved walnuts and then the cheeses. At this point the casserole can be refrigerated for up to 2 days. Bake until cheese melts and casserole is heated through, about 15 - 20 minutes. 

Note: you can bake the mixture in any type or combination of casserole pans you wish. If you use large individual ramekins,  bake only until the casserole is hot and the cheese melts, about 10 minutes. 

Enjoy! 

Friday, February 8, 2013

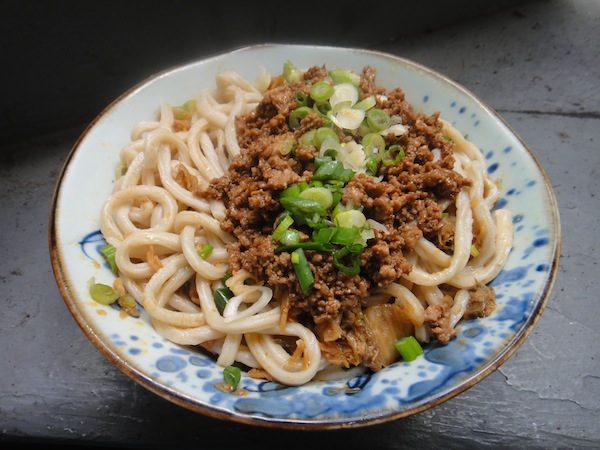
Dan Dan Noodles Recipe


I love Chinese food but I rarely make it at home. I have a few favorite recipes, but I am definitely interested in trying more so I was thrilled to see Fuchsia Dunlop's latest cookbook, Every Grain of Rice which focuses on simple Chinese home cooking. I like the book, my only complaint is that sometimes more explanation of certain ingredients would be helpful; for example in my local Chinese markets I can find lots of different noodles, but some of the recipes just say "wheat noodles" or when I see an ingredient like celery I wonder, should I use conventional celery or Chinese celery? 

I made a dish I adore and which is featured on the cover, Dan Dan noodles. While I have certain ingredients like both dark and light soy sauce, Chinkiang vinegar and Shaoxing wine in order to make this particular dish I went ahead and purchased some sweet fermented sauce and embarked on a search for find ya cai. Ok, this is where is gets complicated. I searched high and low at every Chinese grocery store I could find and there was no ya cai, a kind of preserved mustard green. In fact one store told me they hadn't carried it in a long time despite requests from restaurants. I did find lots of other preserved vegetables and Tianjin preserved vegetable another kind of salt pickled cabbage with garlic which I used instead. It's a delicious savory vegetable that adds a really nice texture to dishes and is fairly easy to find. 

I adapted the recipe just a tiny bit, I didn't think the oil was necessary for frying the ground pork because it is so fatty anyway and of course, I had to substitute Tianjin for ya cai. I am going to keep looking for ya cai, but I am very happy to have discovered preserved vegetables and now that I have purchased several kinds I will be experimenting with them. They are inexpensive, come in many different varieties like turnip and cabbage and mustard green stems, and if you like salty picky flavors they are very appealing!

Note: if you can find ya cai by all means use it

Dan Dan Noodles adapted from Fuchsia Dunlop
Makes 2 large servings

1/4 lb ground pork (I used  fatty not lean)
2 teaspoons Shaoxing wine
1 teaspoon sweet fermented sauce (also called sweet bean sauce)
1 teaspoon light soy sauce
11 ounces fresh wheat noodles, medium thickness (not the very thin or wide ones)
3/4 cup chicken broth
2 teaspoons light soy sauce
1 teaspoon Chianking vinegar (also called black rice vinegar)
3 Tablespoons chili oil or to taste
5 Tablespoons Tianjin preserved vegetables  (Tianjin is often available in a squat brown ceramic pot)
1/4 cup sliced green onions, divided

Heat a wok or large non-stick skillet over medium heat. Add the meat and cook, stirring to break it up. When the meat is cooked, add the Shaoxing wine and the sweet fermented sauce and stir to combine. Cook until fragrant, but still juicy. Remove from the heat and set aside. 

Heat the chicken broth in a pan or microwave, then add to a large serving bowl. To the broth add the soy sauce, Chianking vinegar, chili oil, the Tianjin preserved vegetables and 3/4 of the green onions. 

Cook the noodles then rinse and drain. Toss the noodles with the sauce and top with the meat mixture and the reserved green onions. 

Enjoy! 

Disclaimer: I received Every Grain of Rice as a review copy, this post includes an Amazon affiliate link

Thursday, August 9, 2012

Duck and Mango Soba Salad

Duck and Mango Soba Salad
Duck and Mango Soba Salad is a big bowl of deliciousness--slithery noodles, succulent roast duck, juicy mango slices and vibrant green herbs. The dressing relies on just a few pantry staples. Asian pantry staples that is. I recommend you keep on hand six basic items--Chinese chili garlic sauce, soy sauce, rice wine vinegar, sesame oil, miso and coconut milk. You can expand that list as you see fit. I always have various types of soy sauce and Chinese vinegars, oyster sauce, fish sauce, hoisin sauce, Mirin, Chinese sesame paste, shelf stable packages of tofu, Asian noodles and some Thai curry pastes. A few pantry staples, a stop to pick up a duck at a Chinese deli and a swing through a produce market and you're on your way to making Duck and Mango Soba Salad!

I shop on Clement Street frequently because there are lots of produce markets with a variety of fruit and vegetables I can't find elsewhere (such as Chinese greens and fresh lychees) shops where I can find dim sum to-go and Chinese delis. I know some people like rotisserie chickens, but I prefer Chinese roast duck. Where I live in San Francisco they cost about $12 for a whole and $7 for a half duck. Roast duck is about as versatile as rotisserie chicken but so much tastier and not expensive.

This week I bought some firm green mangoes for a dollar a piece. You don't have to wait until a mango is soft to use it. In fact, some dishes are better if you use a firmer, less ripe mango. This is one of those recipes. If your mango gets very soft, scoop the flesh from the skin and pit, and freeze the pulp. It's great in smoothies, ice cream and baked goods.

Note: Test the noodles before the package instructions indicate they are done.

Duck and Mango Soba Salad 
Serves 4 as a main dish

Ingredients

6 Tablespoons rice wine vinegar
2 teaspoons brown sugar
4 teaspoons soy sauce
1 teaspoon Chinese chili garlic sauce (please tell me you have this, if not, you need it)
1 teaspoon toasted sesame oil

1 7 - 8 oz package buckwheat or cha green tea soba noodles
1 cup Chinese roast duck sliced
1 large firm mango, sliced into matchsticks
4 green onions, slivered
1/2 cup cilantro, chopped or more to taste

Instructions

Whisk the first five ingredients together until sugar is dissolved.

Cook the soba noodles al dente according to package directions. Do not overcook! Once cooked, drain, rinse, and place in a large mixing or serving bowl.

To the soba noodles add the duck, mango, green onions, and cilantro. Add dressing and toss again before serving.

Enjoy!

Wednesday, March 2, 2011

Brussels Sprout & Leek Dumplings Recipe

Brussels Sprout & Leek Dumplings
Do you know the difference between dumplings and ravioli? The secret is the pasta, and it occurred to me when I was creating this recipe. To make ravioli you use pasta dough, which, while silky is still toothsome (al dente). Dumplings can use any kind of dough, including slick wonton skins, which are most definitely not toothsome. Of course there are some exceptions to this rule. I've had some very silky udon noodles lately that use soft, slippery noodles and I've had potstickers which definitely use thicker, chewier dough.

I used to make fresh pasta but I'm too lazy these days, instead I've been experimenting with using wonton wrappers. In the past I used the wrappers to make Afghani leek dumplings called aushak. This time I made dumplings in a similar way, but filled them with a combination of brussels sprouts, leeks, green onions, a bit of garlic and parmesan. Many kinds of ingredients or even leftovers can go in wonton wrappers to make delicious dumplings--meat, cheese, mashed roasted vegetables. Another one of my favorite ways is to fill wonton wrappers is with mashed potatoes. I boil the dumplings and then serve them with butter or sour cream for a quick comforting meal. I even make a simple samosa by mixing mashed potatoes with peas and spices then lightly oiling the dumplings and baking them.

If you haven't tried using wonton wrappers before, or have only used them for making wontons, my advice is, experiment! You can make a filling of your choice then make just one dumpling or two to test and see how you like it. If you make a big batch, freeze them in a single layer on a baking sheet then transfer to a ziplock bag and they'll keep in the freezer for months.


Brussels Sprout & Leek Dumplings42 dumplings

Ingredients

2 teaspoons oil
2 garlic cloves, minced
2 cups leeks, green and white parts, shredded
2 cups brussels sprouts, thinly shredded
2/3 cup, about 4 green onions, thinly shredded
2 Tablespoons Parmesan cheese
Pinch freshly ground nutmeg and black pepper
Wonton wrappers

2 Tablespoons fresh lemon juice
2 Tablespoons extra virgin olive oil
1/4 cup chopped toasted hazelnuts
Parmesan cheese

Instructions

Heat a large non-stick pan and add the oil and garlic. Stir until fragrant, about 30 seconds, then add the leeks, brussels sprouts and green onions. Cooking, stirring occasionally until wilted, about 5-7 minutes. Remove from the stove and allow to cool slightly before mixing in the cheese, nutmeg and pepper. Taste for seasoning and add salt if needed.

To make the dumplings, line up the wrappers, bowl of filling and a small bowl with water. Place a teaspoon of the filling in the center of a wonton wrapper then moisten the edges of the wonton wrapper with water. Fold the wonton wrapper in half diagonally, making sure the ends meet. Press down firmly on the edges to seal.

Meanwhile combine lemon juice and olive oil to drizzle on the finished dumplings. Boil the dumplings in boiling water for a couple of minutes, or until they float to the surface. Drain and serve with the olive oil and lemon juice and a sprinkling of additional cheese and toasted nuts. Note: I reserve a bit of the sauteed vegetables as a garnish as well so guests have a better idea of what is inside each dumpling.

Enjoy!

Monday, October 25, 2010

Red Wine Pasta with Walnuts: Recipe for World Pasta Day

Red Wine Pasta recipe
Pasta is my comfort food. It makes me happy to eat it, to cook it and even to look at it. I love all kinds of noodles from Italian to Japanese, Chinese, Vietnamese and even Spanish noodles. I love the texture and the way noodles are chameleon-like, absorbing flavors and reflecting all kinds of cultures. Noodles have something to say, whether lowly instant ramen or handmade fettuccine tossed with butter and shavings of truffle. I have written about noodles many times and am always glad to participate in anything pasta related and this time, it's World Pasta Day!

I would not stop eating pasta for any reason, but it is good to know that pasta is not an "evil starch" but actually is a slowly absorbed carbohydrate, that has a low glycemic index. That means it does not cause sugar in the blood to rise as quickly as many other foods. Studies have shown that when eaten in healthy portions, pasta does not lead to weight gain, may be beneficial for those with diabetes, may reduce the risk of breast cancer, lower the risk of Type 2 diabetes and may reduce the risk of Alzheimer's disease, prostate cancer. You can read more about it and see links to the medical research in Pasta for All.

I was looking for something new to do with pasta and I came across something not so new. It's a recipe that has been floating around in various incarnations for years. In my usual manner I looked at several recipes and mixed and matched until the recipe worked best for me. I don't want to say this recipe is weird, but cooking spaghetti in red wine gives it an unusual color and flavor. In addition to pasta, this recipe features red wine, walnuts, garlic and olive oil in it, so you can eat it for health or eat it because it tastes good! It has a very earthy and slight spicy flavor and is very pretty on the plate. The new plate by the way is from Villeroy & Boch. They sent me a couple of pieces to play with and I just love them.


Red Wine Pasta with WalnutsServes 4

Ingredients

1 pound spaghetti
3 cups fruity red wine
1/4 cup extra-virgin olive oil
4 small garlic cloves, minced
Pinch of crushed red pepper, or to taste, but don't use too much!
1/2 cup finely chopped parsley
1/2 cup walnuts, coarsely chopped
1/2 cup grated Parmigiano-Reggiano cheese, plus more for serving

Instructions

Cook pasta in a pot of salted boiling water for 2 minutes. Drain then return the pasta to the pot and add the wine. Cook over medium-high heat, stirring from time to time, until wine is just about completely absorbed, 7 to 8 minutes.

Meanwhile in a dry skillet, toast the walnuts over medium heat for 2 minutes or until fragrant. Remove toasted nuts from the skillet and set aside. Return skillet and add the oil, heat over medium. Add the garlic and sprinkle with salt. Cook over moderate heat for 30 seconds. Add the parsley, walnuts and stir for a moment or two. Add the pasta and toss then add the cheese and continue tossing until well combined and glossy. Taste for seasonings, serve, passing additional grated cheese at the table if desired.

Enjoy!

Thursday, January 21, 2010

Macaroni & Cheese with Spanish Peppers: Recipe

Macaroni & Cheese with Spanish Peppers
I love quick and easy recipes. So I must confess, when I make macaroni and cheese I generally cook it on the stove top and subsequently eat it as fast as I can get it onto my plate. But if I had my choice, I like a bubbly casserole of macaroni and cheese, moist, oozing with cheese, spiked with a little hot mustard and paprika. The perfect macaroni and cheese for me would also have some chewy cheese around the edges and a crisp topping for contrast. I wondered, does everyone prefer this style? So I asked on Twitter and fifty nine people told me they prefer baked macaroni and cheese and about four said they are happy with stove top versions. Baked it is!

ingredients for Macaroni & Cheese with Spanish Peppers
Macaroni and cheese is a very versatile dish, some recipes use a white sauce, others a custard sauce and some have no sauce at all. Many variations include the addition of ham, bacon, tomatoes or peas. When it comes to cheese, I've seen recipes using American cheese, gruyere, cheddar, Colby, Monterey jack, and even goat cheese. Most recipes I've seen rely on a combination of cheeses, which adds more depth of flavor.

soupy texture
In preparing to create a baked version I read an article in the New York Times that said most times recipes don't use enough cheese, they recommended twice as much cheese as macaroni. It took several tries to get this recipe right, and along the way I discovered a few more keys to a great macaroni and cheese casserole. If you cook the macaroni all the way through, it will be overcooked after you bake it. For baked versions, you need to undercook the macaroni, and make sure the sauce is fairly soupy so the macaroni has something to absorb. I like layering some cheese to ensure some gooey cheesiness along with a cheesy sauce. Finally a topping of butter, parmesan and panko yields a crunchy and flavorful crust. Panko is crunchy even before being baked, but if you want a dark brown crust, you may need to broil it for a few minutes.
oven ready casserole

For this recipe I used a combination of sharp cheddar and a fairly new cheese, Bellavitano made by Sartori in Wisconsin. In some ways it's a bit similar to parmesan cheese, it has a dry texture and little crunchy crystals, but it's also a bit like an aged cheddar in terms of flavor and how it melts. Because it's so intensely flavored you don't need quite as much of it when you cook with it. My personal touches to this recipe were the addition of sweet sauteed onions, smoked paprika and piquillo peppers. I wanted to spice it up, but gently. The smoked paprika also lends an orange color to the casserole which is nice if you are using a white cheddar, as I did.
Macaroni & Cheese with Spanish Peppers

Macaroni & Cheese with Spanish PeppersServes 6-8

Ingredients
3/4 lb elbow macaroni
1/4 cup butter
1 medium onion, diced
1 Tablespoon Spanish smoked sweet or hot paprika "pimenton de la vera"
1/4 teaspoon dry mustard
1/4 cup all purpose flour
4 cups whole milk
1/2 lb Bellavitano cheese, shredded
1/2 lb sharp or extra sharp cheddar cheese, shredded
10 ounces about 1 1/4 cups piquillo peppers drained and diced

Topping
1 cup panko bread crumbs
2 Tablespoons unsalted butter, melted
1/3 cup parmesan cheese

Directions
Preheat oven to 375 degrees. Bring a large pot of salted water to boil. Add pasta to the water, cook until almost al dente (half as long as directed) drain and reserve.

Heat a large pot over medium heat and add butter. When butter melts, add the onions and cook until softened, about 5 minutes, stir in paprika and dry mustard, cook over low for about a minute. Add the flour and cook a minute more, stirring. Whisk in milk slowly, and bring up to a simmer, thicken over medium low heat for a couple of minutes.

Turn off the heat and allow to cool for about 5 minutes, then stir in the drained macaroni, Bellavitano cheese and piquillo peppers. Layer the pasta and cheddar cheese in a broiler safe 13 x 9 inch pan, in 3 layers, starting with the macaroni and ending with the cheese. In a small bowl combine the panko, butter. and parmesan. Sprinkle topping evenly over macaroni and bake for 30 minutes. Broil for 2-3 minutes if you want a browner crust.

Enjoy!

For more macaroni and cheese recipes check out http://www.30days30waysmacandcheese.com/