Sunday, June 10, 2012
Thinly Sliced Beef Yakitori
Plunging a stick in food was a genius idea – I sincerely wish we could thank the person who originally thought of doing that. Think about hard candy. If someone was like ohh, here have some candy and they handed you hard candy you would be like um thanks? But get a stick in that hard candy and it becomes fun! You would totally be happy if someone gave you a lollipop. Take a corn dog... If possible, Seth would probably divorce me and marry the person who came up with that. Take the stick out of the cornbread encrusted hotdog, and he would be like ehhh, ok. But once that stick is there it is all like, ohh my god must have it. Here, we take fresh beef flap meat, marinate it in a homemade teriyaki sauce, skewer it, then grill it over high heat, brushing it with a thickened version of the marinade. Like eating a popsicle, but all meaty and umami. And you know, grilled. And not frozen. Actually the opposite.
Ingredients
2/3 cup mirin
1 cup soy sauce
4 teaspoons rice vinegar
1 teaspoon sesame oil
¼ cup brown sugar
7 cloves garlic, minced
1 tablespoon minced ginger
1 tablespoon minced jalapeno pepper
1 inch strip of orange peel
1 pound flap steak, thinly sliced across the grain
1 tablespoon cornstarch
1 tablespoon water
10-15 bamboo or wooden skewers
5 tablespoons canola oil (for grilling)
rice, for serving
Instructions
Place the mirin in a medium pot and boil over high heat. Reduce to medium low and add the soy sauce, rice vinegar, sesame oil, brown sugar, garlic, ginger, jalapeno, and orange peel. Simmer for 20 minutes. Place half of sauce in a Ziploc bag or container and refrigerate until cool.
Take thinly sliced beef flap steak and cut into 1½-2 inch strips for skewering. Submerge in cooled marinade and refrigerate for at least another hour. Take bamboo or wooden skewers and soak in cool water for 30 minutes.
In a small bowl, whisk the cornstarch with water. Bring the remaining sauce to a boil and thicken with the cornstarch mixture, constantly stirring. Let the sauce cook for 5 more minutes, tasting to make sure the cornstarch has fully dissolved. Once ready, pour into small bowl and set aside.
Preheat grill to high (roughly 400°). Just before grilling, take marinated beef and skewer so that the meat can lie flat. Place canola oil in a small bowl. Using a paper towel or cloth, dip in canola oil and rub over hot grates to prevent sticking. Lay beef skewers over heat and stay nearby to monitor. Once bottom is a little charred, brush the tops with canola oil, and flip. Brush again with thickened teriyaki sauce. Once the bottoms are slightly charred again, be careful not to overcook, flip and brush with thickened teriyaki sauce, so both sides are sauced. Remove and garnish with toasted sesame seeds. Serve with rice.
Friday, June 8, 2012
Day 195.5 China! Pot Stickers (Pan Fried Dumplings)
Only two countries left to go before I complete my world cooking journey, and I just can't bring myself to go there yet. So, in an effort to postpone the bitter-sweet inevitable, I'm circling way back to China (the 36th meal I cooked when first starting out) to make my son Ian's very favorite Chinese appetizer - Pot Stickers.
The name alone should be reason enough to make these delicious pan fried dumplings, and the filling? Well, fugetaboutit. Traditionally eaten as a snack or an appetizer throughout China, these dumplings are actually very easy to make. Prepping the filling takes a little time, but after that, it's a piece of cake. Or a dumpling. I forgot to get ground pork, but I had a small pork sirloin roast in the fridge, so I cut off a chunk and ran it through my food processor - presto. Note to self: grind your own pork and beef dummy; it's significantly cheaper than the pre-ground stuff, sans all the funky additives or filler mix-ins.
I made these this morning, so we had them for breakfast. Who cares if we all have garlic breath for the rest of the day - it's totally worth it. But, if you can't wrap your head around pot stickers for breakfast, they make a perfect appetizer, snack or side dish. And, if you want to make them vegetarian, simply dice up tofu in place of the pork. Enjoy!
Dried Shitake mushrooms for the filling - how beautiful are these?
Soak for 30 minutes in warm water, then mince (I used my mini food processor)
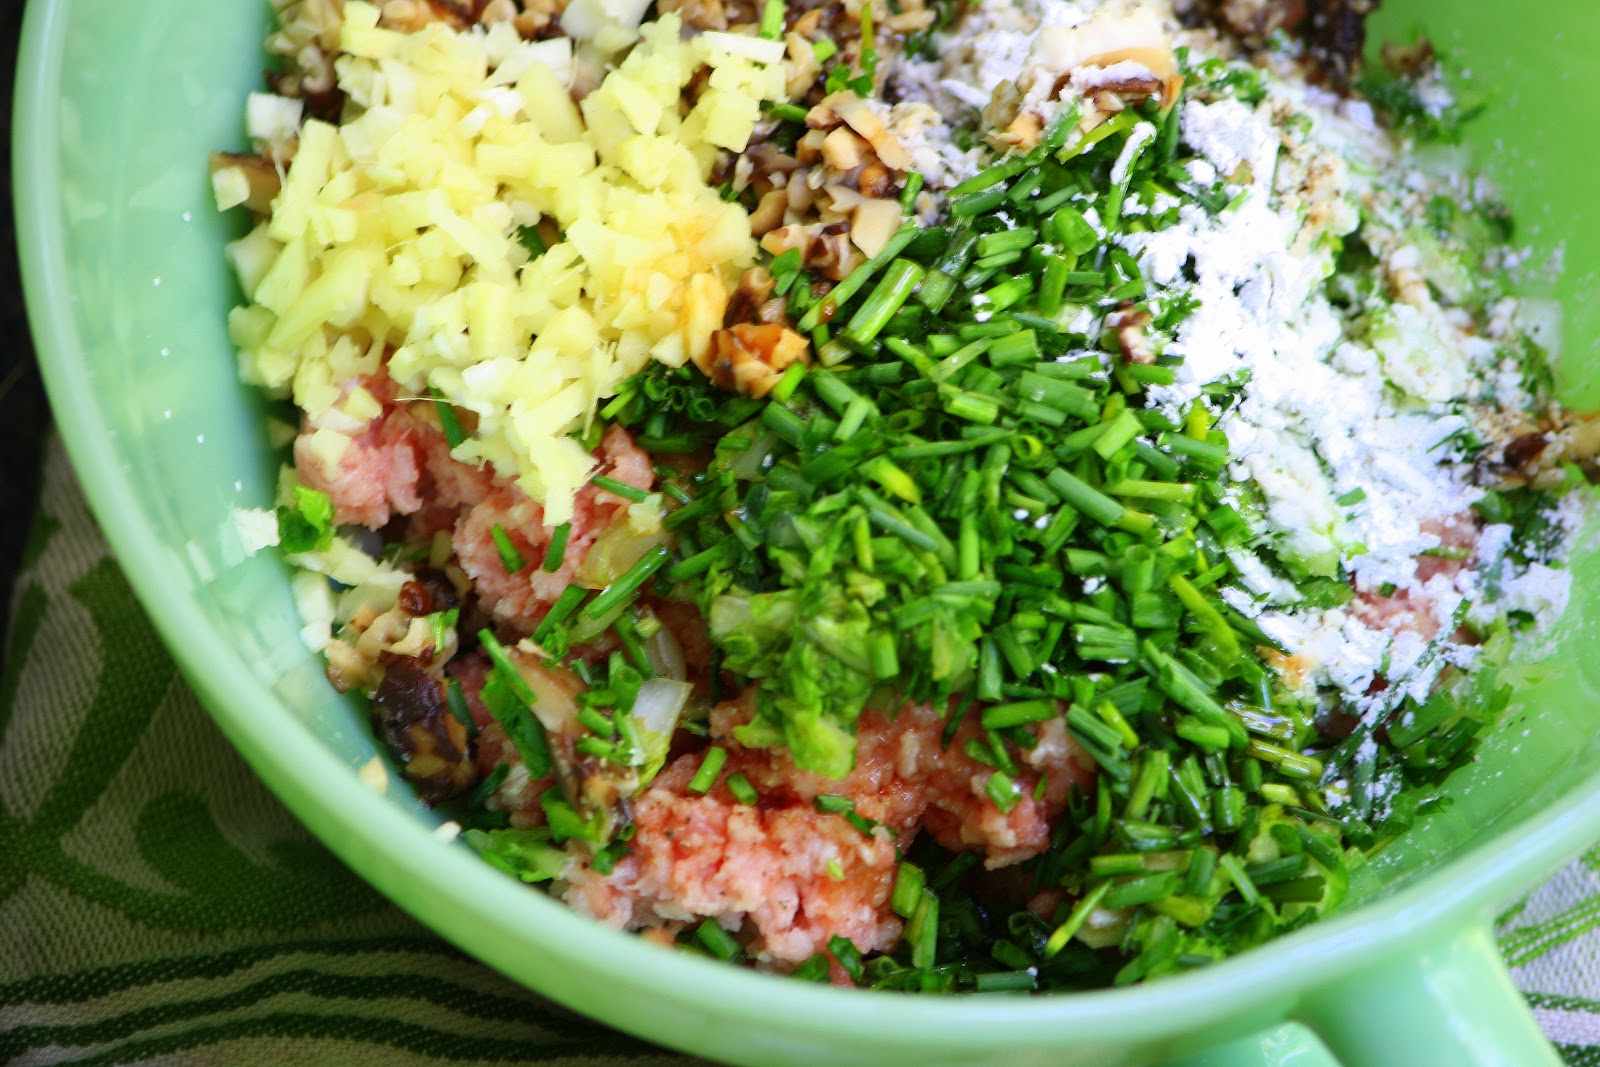
Mince two cups of napa cabbageFilling: Chives, mushrooms, cabbage, soy sauce, sesame oil, ginger, garlic, ground pork and corn starch
Combine all ingredients and mix very well
Brush the edges of a wonton wrapper with water (keep the others covered with a damp towel)Fill with one teaspoon of filling
Fold, seal and pleat the edges
Put on a cookie sheet that's been lightly dusted with flour - then fry, add broth and steam
Pot Stickers (Adapted from Williams-Sonoma, Asian)
1/4 cup dried shiitake mushrooms
2 cups finely chopped napa cabbage
1/2 tsp. salt
1/4 lb. ground pork
1/2 cup minced fresh garlic chives
1 Tbsp. each light soy sauce and Asian sesame oil
1-1/2 tsp. peeled and minced fresh ginger
1 clove garlic, minced
1-1/2 Tbsp. cornstarch
1/8 tsp. ground white pepper
45 thin, round wonton wrappers
4 Tbsp. canola or peanut oil
1 cup low-sodium chicken broth
Ginger-soy dipping sauce
Soak the dried mushrooms in warm water for 30 minutes, then drain, remove the stems and mince the caps.
In a large bowl, toss together the cabbage and salt and let stand for 30 minutes to leach out excess water from the cabbage. using your hand, wring out as much of the water from the cabbage as you can. Discard the water and place the cabbage in a clean bowl. Add the mushrooms, pork, garlic, chives, soy sauce, sesame oil, rice wine, ginger, garlic, cornstarch and white pepper. Using a rubber spatula, mix until very well and thoroughly combined.
To fill each pot sticker, place a wonton wrapper on a clean work surface and brush the edges with water - be sure to keep the other wrappers covered with a slightly damp kitchen towel to keep them from drying out. Place 1 teaspoon of filling in the center of the wrapper, fold the wrapper in half to enclose the filling, then pleat the out edge. Place finished pot sticker on a lightly floured baking sheet. Repeat until all the wrappers are full.
Preheat the over to 250F. In a large non-stick frying pan over medium-high heat, heat 1 tablespoon of the canola oil. Add 10-12 pot stickers, flat bottom down and in a single layer. Sear until gold brown on the bottom, 3-4 minutes. Next, pour 1/4 cup of the broth into the pan, cover and let steam until all the broth evaporates and the pot stickers are tender but still firm and the filling is cooked through, 4-5 minutes. Transfer to a platter, cover with aluminum foil and keep warm in the over.
Serve with ginger-soy dipping sauce.
Ginger-Soy Dipping Sauce
5 Tbsp. rice vinegar
1/4 cup light soy sauce
2 Tbsp. dark soy sauce
3 Tbsp. warm water
1-1/2 Tbsp. sugar
1 Tbsp. Asian sesame oil
1 tsp. Sriachi chili sauce
2 Tbsp. peeled, minced fresh ginger
2 tsp. minced garlic
2 tsp. red jalapeno chile or other fresh hot red chile, seeded and thinly sliced on the diagonal
In a small non-reactive bowl, whisk together the vinegar, light and dark soy sauces, warm water, sugar, sesame oil and chile sauce until the sugar dissolves. Stir in the ginger, garlic and chile. Use immediately or cover and refrigerate for up to 2 days. Also very good with noodles!
© 2010-2012, What's Cooking in Your World? Sarah Commerford/All Rights Reserved
Thursday, June 7, 2012
Grilled Artichokes with Lime Aioli & Cotija Cheese
Today we were lucky enough to guest post on one of our favorite blogs, Lazaro Cooks! We are super excited about it, because Lazaro is a truly fantastic and innovative food blogger. His site, his cooking style, plating, and presentation are all top notch, and we agree with much of his perspective on cooking and food blogging in general. We're honored to be included as guest contributors. Here is a snippet from our post. For the full post and recipe, head on over to our post on Lazaro Cooks.
"We thought we would go ahead and celebrate one of our local, seasonal favorites by sharing this new recipe for Mexican-style grilled artichokes. This recipe combines three things that we absolutely love – grilling (I mean, how can you resist that siren song of smoke, charcoal, fire, and cast iron grates), artichokes (we have a doormat decorated with artichokes and an artichoke-shaped candle, just to give you an idea of the depths of our love for this vegetable), and dipping (we are obsessed with foods that involve dipping; it’s such an active, communal way to eat)."
FULL RECIPE and post
Tuesday, June 5, 2012
Del Popolo Pizzeria
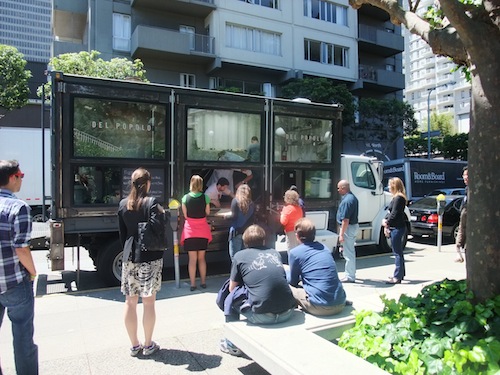
Del Popolo might look like a pizza truck, but according to the proprietors, it's a mobile pizzeria. At a reported $180,000 to build the thing, I think they can call it whatever they like. It's a refurbished shipping container with an actual pizza oven inside plus minimal prep space for a couple of cooks.
Will people stand in line to buy a pizza? On the streets of San Francisco? Oh yes, they will!
This is the set up. A mini kitchen and pizza oven and a window where orders are taken and pizza "delivered."
They offer some wacky sodas including Cheerwine, Manhattan Special and Empire. But being parked across the street from a supermarket, there was no shortage of choices.
So how was the pizza? Excellent. There was a nice char on the crust, but not too much. I'd call it a Neapolitan style crust, airy and chewy. The sauce and cheese were flavorful and in good balance. The sauce was very fresh tasting and they didn't skimp on the basil. I'd order this pizza again.
The white pizza was a little more substantial with generous dollops of fresh sweet ricotta and plenty of garlic. Not in the least greasy, it was rich from the cheese and yet somehow light at the same time. Recommended.
Where to find it? It's not on the namesake square in Rome, so you'll have to check Twitter to find out...
Sunday, June 3, 2012
Strawberry Lime Basil Sherbet
August 25, 2010 was a very special day in our lives. Very special. I remember everything so clearly. The blue skies, birds chirping, bright sun shining its rays down on us… the knock on the door by the delivery guy. I will never forget that day – the day that our ice cream maker arrived at our doorstep. I remember feeling excited – I would finally be able to make a dessert that Seth would love. He never had much of a sweet tooth, except when it came to ice cream. And I felt powerful – the ability to make this sweet treat was now in my control – take that milk and cream! Of course, once I realized I would have to wait a day to make ice cream, because the bowl of the ice cream maker has to be chilled, I was super disappointed. Ever since its initiation by freezer, however, it has been one of the most beloved appliances in our kitchen. I can’t even remember what life was like without it. Our most recent concoction is this strawberry lime basil sherbet. I wanted to take this fruit salad, whose flavors worked so well together, and make it into a cold ice cream treat. It tastes fruity, yet unique, and is just perfect for summer.
Ingredients
½ cup sugar
¼ cup water
1/2 cup chopped basil
1 quart strawberries, hulled and chopped
3 cups milk
3 -4 tablespoons lime juice
1 ½ teaspoon lime zest
Instructions
To make the basil syrup: Place sugar, water, and basil in small pot. Gently boil until the sugar has dissolved, about 8 minutes. Take off heat and strain out the basil. Chill.
To make the sherbet: Use a blender (I used my trusty immersion blender) to puree the strawberries, milk, basil syrup, lime juice, and lime zest together. Churn in ice cream maker according to manufacturer’s directions. I find that this doesn’t freeze particularly well, so if you do freeze it, you may want to take out the sherbet 20 minutes before you serve.
Friday, June 1, 2012
Day 195! Yemen~Ghraybeh (Shortbread and Pistachio Cookies) with Homemade Rose Water - Up Next, Zambia
Maybe it's because of my Irish heritage, or perhaps it's the neighborhood I live in that was settled by the Irish in the 1800's, but when the opportunity came along to make a homemade still, I simply couldn't resist. But don't get too excited. I'm not making hootch, rather, I'm distilling rose petals from my garden to make rose water. Aside from the thrill of making this heavenly scented concoction, most Middle Eastern and Arabic cooking uses some form of rose water, orange blossom or jasmine water in all kinds of cooking. Seeing as roses are in bloom, and I'm cooking in Yemen, I had to give this a shot. The end product is not as "rosy" as commercially sold rose water, but pretty close! As for the cookies, imagine rich, crumbly shortbread, scented with roses and spiced with exotic cardamom ~ lovely. Lastly, a big shout-out to my friend, Lee at Cambridge Cooks for the kitchen visit and Sofra snacks!
![]() |
| Map Courtesy of Lonely Planet |
Cuisine in Yemin is different from typical Middle Eastern cooking as it has Ottoman and Turkish influences, as well as Afghan, Moroccan, African and Arabian traditions. Chicken and lamb are the primary source of protein, with fish being eaten in the coastal region. Cheese, butter and dairy are eaten in moderation, but buttermilk, vegetable oil, ghee and clarified butter are used in cooking daily. Spices and seasonings often used include (but are not limited to)anise seed, fennel, ginger, honey, garlic, onions, chilies,rose and orange blossom water, sesame and poppy seeds. Tea and very strong coffee are enjoyed in restaurants and in homes.
I picked a variety of roses from my backyard
Some are domestic and some wild tea roses
I took the petals off the stems
All you need to make a still: fire place brick, metal or glass bowl and a large pot with a domed lid
Once water comes to a boil, dump a bunch of ice on the lid. The ice melts and condensation drips down into the bowl.
For the cookies: semolina, powdered sugar, flour, canola oil and pistachios
...and cardamom and roses <3
Pine nuts and almonds can be used as well as pistachios
Shape the dough into an "s", diamonds or wreaths
These delicate cookies are heavenly scented and flavored with rose water and cardamom
Ghraybeh (Shortbread Cookies) Adapted from The Spice House
1-1/4 cups all-purpose flour
1 cup semolina flour
1 cup powdered sugar, plus more for dusting
1 cup clarified butter (ghee), softened or canola oil
2 teaspoons rose water
1/4 teaspoon ground cardamom
1/4 cup (approximately) shelled pistachios
1/4 teaspoon fine-grained salt
Preparation Instructions
Preheat oven to 300 degrees.
Mix together the butter, sugar, and rose water until light and creamy. Sift together flours, salt and cardamom and stir into butter mixture until well combined. Chill dough for 30 minutes.
Form dough into grape-sized balls, then shape balls into wreaths, diamonds, "s" shapes, etc. (or leave round). Place a pistachio on each cookie.
Arrange cookies 1 inch apart on ungreased baking sheets. Bake 18-20 minutes, until cookies are dry to the touch and just starting to change color. Transfer cookies to a rack and immediately dust heavily with powdered sugar.
Makes about 3 dozen cookies.
Blanched almond or pine nuts can be used in place of pistachios. Rose Water can be substituted with orange flower water or with whiskey or other flavors.
Ingredients:
Homemade Rose Water - Adapted from care2com
Be sure you have a brick and heat-safe stainless steel or glass quart bowl ready before you begin.
2-3 quarts fresh roses or rose petals
Water
Ice cubes or crushed ice
1. In the center of a large pot (the speckled blue canning pots are ideal) with an inverted lid (a rounded lid), place a fireplace brick. On top of the brick place the bowl. Put the roses in the pot; add enough flowers to reach the top of the brick. Pour in just enough water to cover the roses. The water should be just above the top of the brick.
2. Place the lid upside down on the pot. Turn on the stove and bring the water to a rolling boil, then lower heat to a slow steady simmer. As soon as the water begins to boil, toss two or three trays of ice cubes (or a bag of ice) on top of the lid.
3. You’ve now created a home still! As the water boils the steam rises, hits the top of the cold lid, and condenses. As it condenses it flows to the center of the lid and drops into the bowl. Every 20 minutes, quickly lift the lid and take out a tablespoon or two of the rose water. It’s time to stop when you have between a pint and a quart of water that smells and tastes strongly like roses.
© 2010-2012, What's Cooking in Your World? Sarah Commerford/All Rights Reserved
Thursday, May 31, 2012
Pistachio Pesto Penne
I owe pasta an apology. I’ve abandoned it for a bit. I didn’t hate it! But somewhere along the way, I just lost my desire for it. It would sit there in their boxes on the shelf in the cupboard. Just waiting. And waiting. Not being opened. Just sitting there in their place in the pantry. But one day recently, I realized I missed it. And now I can’t get enough. I’m so sorry to have abandoned you dear pasta. Please forgive me. I have no idea what I was even eating all those weeks – rice, perhaps? I promise to never leave you like that again. You come in a myriad of shapes and sizes, and go so well with all types of concoctions – tomato sauce, meatballs, cream sauces, olive oil…and pesto. After trying you with this creamy pistachio pesto, I don’t know how I ever could have abandoned you! Plus, who can turn down an opportunity for alliteration?
Ingredients
¼ cup pistachios, shelled and salted
¼ cup basil
¼ cup tarragon
2 garlic cloves
3 tablespoons extra virgin olive oil
8 ounces pasta (I used penne)
1/3 cup reserved pasta water
1/3 cup heavy cream
½ teaspoon lemon zest
1 teaspoon lemon juice
Instructions
To make the pesto: Place pistachios, basil, tarragon, and garlic cloves in the bowl of a food processor. Pulse. Slowly pour in the olive oil while the food processor is still running. Set aside.
Bring a large pot of salted water to boil, and make the pasta according to the package directions. Be sure to reserve 1/3 cup of the pasta water before draining.
In a large sauté pan over medium-low heat, mix the pesto, reserved pasta water, heavy cream, lemon zest, and lemon juice. Once everything has been heated, add the cooked pasta to the pan and toss to coat.
Subscribe to:
Posts (Atom)