-->

Thursday, December 6, 2012

The Bus Cake, with Eggnog and Chocolate Chip Batter


Yep, it is indeed a bus-shaped cake.  You totally know that your life isn't complete until you've experienced the bus cake.  When most of us are out and about, buses are just another mode of transportation peppering the landscape. But to a certain 34 inch tall toddler, this mode of transportation is the most amazing thing ever.  Ever.  One never knew how much joy was to be had by a bus sighting until now.  His enthusiasm for this marvel of human innovation is so infectious, both Seth and I even find ourselves becoming genuinely excited when we spot a passing bus.  And a corresponding twinge of sadness when said bus moves out of sight.  Countless minutes have been spent doing Google image searches of buses, taking time to admire each and every bus on the page.  He is a delightful bus companion, radiating toddler glee while riding in this most favored vehicle, and every few minutes exclaiming "bus," as though I would have forgotten that we were on a bus.  Since it was his birthday last week, we decided to tackle a bus-shaped cake.  I made the icing and cake, and Seth assembled it into its bus form.  We originally wanted a double-decker London style bus, but we belatedly realized that much more cake would be needed.  Oh well... he recognized it immediately, exclaiming, "BUS!" and dove right in, so mission accomplished.  With the eggnog and chocolate chip batter and buttercream frosting, it was pretty tasty as well.

adapted from
cooking light pound cake

Ingredients
Cake:
3 cups cake flour
1 teaspoon baking powder
1/2 teaspoon baking soda
1/2 teaspoon salt
1 1/2 cups sugar
3/4 cup unsalted butter, softened
1 tablespoon vanilla extract
3 large eggs
1 cup buttermilk
1/3 cup egg nog
2/3 cup semisweet chocolate chips

Icings:
1/2 pound unsalted butter
3 cups confectioners sugar, whisked
1 tablespoon heavy cream
2 teaspoons vanilla extract
1/2 teaspoon almond extract
1/4 teaspoon salt
red food coloring

1/2 pound unsalted butter
3 cups confectioners sugar
1 tablespoon heavy cream
2 teaspoons vanilla extract
1/2 teaspoon almond extract
1/4 teaspoon salt
black food coloring

Decorations:
4 mini chocolate frosted donuts
2 yellow chicklets for the front lights
2 red chicklets for the tailights

Instructions
For the icings:  Beat butter in electric mixer.  Add in sugar.  Mix in cream, extracts, salt, and red food coloring.  Set aside, and repeat process for the black icing.

For the cake:  Whisk flour, baking powder, baking soda, and salt in a medium bowl and set aside.  In another bowl, stir eggnog and buttermilk together.  In mixer, beat butter and sugar on medium speed until light and fluffy.  Add in eggs one by one, being sure to mix well after each one.  Mix in vanilla extract.  Turn mixer to lowest setting, and alternate between adding flour and the buttermilk/eggnog mixture into the mixing bowl.  Once the flour and buttermilk mixtures have been incorporated, place batter in two greased 9x5 loaf pans and bake at 350 for about 50 minutes, or until cake tester comes out clean.  Cool in pans for 10 minutes then remove to cool on wire rack.

For the assembly:  Once the cakes have cooled, cut into rectangles by slicing off any ends and curved parts, you want nice rectangles to work with.  Spread red icing on one and stack the other on top.  Place donuts where they will eventually fit as wheels, and tracing around them, cut out chunks of the cake to make wheel wells.  We didn't think of this until after making the cake, which is why the wheels stick way out on the sides.  Spread red icing all over.  Spread the grey-black for windows.  Pipe grey-black around the windows using a a pastry bag or ziplock bag with a corner cut off.  Paint the donuts with the grey-black frosting, and use toothpicks to keep the wheels in place.  Add the yellow Chicklets to the front of the bus and the red ones to the back.


Wednesday, December 5, 2012

Holiday Gift Fairs 2012


If you are interested in San Francisco Bay Area made treats and treasures, these three gift fairs should be on your radar for this weekend, December 7 - 9, 2012. 

La Cocina Gift Bazaar
This year the La Cocina Gift Bazaar is taking place downtown! It will be at the Crocker Galleria at 50 Post St from Friday, December 7th from 1 pm - 7 pm. There will be live music and plenty of delicious things to eat and give as gifts. Some of my favorites include Kika's Treats, Global Grub, Maite Catering, Love & Hummus and Azalina's. This is a great event, put on by San Francisco's first non-profit incubator kitchen.  I've gone every year. Don't miss it! 

Speakeasy Holiday Indie Mart
Hosted by Indie Mart this Saturday, December 8th, from 12 pm - 6 pm is the Speakeasy Holiday Indie Mart at Speakeasy Ales & Lagers, 1195 Evans Ave, Bayview. Tour the brewery, purchase packaged foods and sweets or find something to eat at one of the food trucks. A shuttle will be available for $3 to get you there, look for details coming soon. Sorry I don't have a listing of vendors, but I'm sure this will be a worthwhile event.


SFMade Holiday Gift Fair
I'm a big fan of the Fort Mason farmer's market and this weekend there is even more reason to go, the SFMade Holiday Gift Fair will be taking place from 10 am - 6 pm at the Herbst Pavilion. Keep an eye out for local favorites including Bi-Rite, Heath Ceramics, The Chai Cart, Poco Dolce, also NeoCocoa and Clairesquares (both of whom will also be at the La Cocina event on Friday). 

Tuesday, December 4, 2012

Holiday Cookbook Gift Guide 2012

 Here are my picks for great gift worthy cookbooks! From coffee table books, to DIY books and more... 

Big and beautiful coffee table books

Some cookbooks are really coffee table books. They are large, filled with glossy photos and tell intriguing stories--they are the anti-ebook. The recipes and the restaurant recommendations are kind of secondary. These two books will satisfy the armchair traveler who loves to eat.

Lonely Planet's Food Lover's Guide to the World: Experience the Great Global Cuisines is over 300 pages of stories, photographs, recipes, and recommendations for where to find some of the most iconic dishes in the world--everything from Korean Bibimbap to Argentinian Empanadas and French Tart Tatin. Along the way you'll find food festivals and drinks, rules of etiquette, cooking schools, ingredients and markets. This is a book probably written using clips from guide books and then some. It definitely is the right book for someone who travels a lot or plans to. There is plenty of advice and direction for where to go, what to eat and even how to eat it. The recipes are definitely secondary. Some of them are not terribly well written but they do add flavor to the book.

Saveur The Way We Cook: Portraits from Around the World is a glossy book of full page photographs, there are some stories too, but mostly it's photos. At the back of the book are 50 recipes including Bistro French Fries, Layered Herring Salad and Dry Cured Olives with Rosemary and Orange. It's a book to get lost in, not so much for planning trips like the Lonely Planet book. It's as if Gourmet and National Geographic somehow came together in one. It's a book that truly appreciates the food ways of foreign places--be they in Tennessee or Tehran.This book is for anyone who enjoys photography as much as travel and exploration. 

Make it

For DIY types, a how to book and a jar of something delicious is probably the best gift of all. I've picked three that I think really stand out.

Mother in Law's Kimchi is the best kimchi I have ever eaten. Really. So I couldn't be happier to see The Kimchi Cookbook, filled with recipes for making spicy succulent kimchi and using it, from Lauryn Chun. The photos make kimchi sexy! I've bookmarked Quick Cucumber and Chive Kimchi and French Breakfast Radish Kimchi. There are recipes for kimchi and recipes using kimchi, like Kimchi Cornmeal Pancakes.

The ingredient section will help get you up to speed on what's necessary to create authentic Korean flavors. But the uses of kimchi are not all traditional. Pair this book with a jar of kimchi (perhaps even homemade!) and give it to your favorite chile head. 

Jams are hot stuff. I am going to share some of my favorites in another post for now let me say, making jam rivals eating it. It's an outlet for creativity and allows us to preserve the best of every season. I've reviewed jam cookbooks in the past, but I particularly like Jam On (from Laena McCarthy of Anarchy in a Jar)because it enables you to customize and come up with your own flavors, there's also pickled fruit, fruit butter and shrub recipes and some nice suggestions for ways to use jams and marmalades you might not have considered like in a roast chicken recipe, in cocktails and even risotto. I tried Anarchy in a Jar jams and was mightily impressed. My favorite was the Grapefruit and Smoked Salt Marmalade, but any jar plus this book would make a truly fine gift for the DIY maven in your midst. 

For the hardcore DIY types, kimchi and jam may be child's play. But I bet making salami isn't. Michael Ruhlman's Salumi will walk you through the steps and techniques to making Italian style salami and many variations. Cotechino, pancetta, lonza, coppa, even culatello which is not imported from Italy to the US, t's all here.

There are also recipes for using your homemade product like Coppa, Orange & Onion Salad and Spuma di Mortadella.

For someone who has already taken on charcuterie, this is what comes next.


And now for something completely different

Perhaps it's because I went to Israel this year, but Jerusalem is the cookbook I keep gravitating towards. The sensibility is just different. And yet very appealing.

Written by a Jew and an Arab both from Jerusalem, it's hard to put your finger on because the dishes featured have Middle Eastern, Eastern European and Sephardic roots. But it has a freshness and vibrancy that speaks to the place that inspired it. So some of these recipes may be familiar, but many are combinations that will excite you! Roast Chicken with Clementines & Arak, Butternut Squash & Tahini Spread, Lamb Stuffed Quince with Pomegranate & Cilantro and Swiss Chard Fritters are just a few of the intriguing recipes in the book.


Wild and wonderful 

This is a trend I predicted for 2012. And it continues to take off with two fantastic books that help you find you to find, cook and enjoy foraged wild ingredients. 

The first recommendation is for Foraged Flavor. This book really makes it easy to explore and identify edibles in your backyard and beyond. The photos are great. The recipes are eclectic with Italian, French and Asian playing starring roles. They are mostly very easy and very appealing.

Recipes include Daylillies stuffed with Lobster, Avocado and Sushi Rice, Purslane Eggplant Caponata and Dandelion Flower Jelly.

A Feast of Weeds is a bit more academic, not surprising since it was written by an Italian professor. The book explores the literary side of the plants that you can find and cook. The recipes are solidly Italian and anything but run-of-the-mill! Consider Pomegranate Risotto, Polenta with Nettles and Spaghetti with Wild Arugula. Talk about cucina povera. This is the real deal.

While written by a professor the book is very approachable and easy to use and appreciate.

The book features lovely drawings but no photos. The essays that go with each ingredient are less field guide and more Humanities or Classics major. You can read an excerpt.


So pretty! 

For someone who loves to entertain, nothing could be a more welcome gift than this gorgeous gold trimmed little volume--Ladurée: Entertaining: Recipes, Ideas & Inspiration which comes packed in tissue in it's own box.

While not terribly practical for weeknight dinners, it will be a great source of inspiration with stylish tips and modern recipes like  Lobster Rose Petal Carpaccio and Sea  Bass Tartar with  Grapefruit and finally classics like Orange-Passion Fruit Macarons, Tableware, glassware, and yes, etiquette are all addressed. For the girliest girl (or boy) on your list or that relative that has everything


For other books I've recommended this year:
Mexican Cookbook Roundup

The Epicurious Cookbook & MyRecipes America's Favorite Recipes

Food Blogging Resources

Cookbooks for Right Now

DIY Canning & Preserving

Disclosure: This post contains Amazon affiliate links

Sunday, December 2, 2012

Latkes with Clarified Butter, Cotija Cheese and Truffled Ketchup


We have almost reached that time of year.  The one where I put notations on the calendar to highlight the days of Hanukkah, and put a star on the day or days on which we intend to make latkes.  Then, all too often, end up hurtling though the entire holiday, forgetting to look at the calendar, and failing to celebrate even just one of the nights. Possibly that time of the year we end up ordering pizza on the night we were supposed to do the latkes.  Not this year.  We like the idea of celebrating Hanukkah, even if we completely fail at celebrating any of the other Jewish holidays.  I think doing one holiday makes us feel like we are keeping up tradition just a teeny tiny bit, even if it's not technically a major holiday.  However, we're not exactly traditionalists, so we find latkes a fun opportunity to try new flavor combinations we may never have thought of.  Seth got the idea for these after eating french fries with cotija cheese and clarified butter from a gourmet food truck.  They were so amazing, he thought we should put those flavors into latkes and serve them with truffled ketchup.  I'm pretty sure no phone calls will be made to a local pizza place this Hanukkah.  

Ingredients
1 pound unsalted butter
2 pounds russet potatoes
1 medium onion
1 small bunch scallions, chopped
1 egg, beaten
kosher salt and freshly ground black pepper, to taste
cotija cheese, crumbled
scallions, chopped
fleur de sel
ketchup (preferably Heinz), for serving
white truffle oil, for serving

Instructions
To clarify the butter, chop the sticks up and place in a medium pot over low heat.  Melt the butter.  After a few minutes, you will start to see foam covering the top.  Once that stops bubbling up, take off heat and use a spoon to skim off the top layer of foam.  Set a piece of cheesecloth over a mesh strainer and place over a heat-proof container.  Pour the butter through the cheesecloth and strainer into the container.  

Peel the potatoes, keeping the peeled potatoes in cold water.  Once they're all done, grate the potatoes and the onion into a medium bowl.  Once all grated, begin squeezing the water out of the shredded potatoes and onion and transferring them to a new bowl.  Left behind should be some water and, underneath, some separated potato starch.  Take out the starch and mix it back in with the grated potatoes and onion.  Add in the chopped scallions, beaten egg, and generous pinches of salt and pepper.  Mix everything together.  Form thin patties with the mixture (the thinner, the crispier), and cook in a skillet (preferably cast-iron) over medium-high heat in the clarified butter. Once one side has browned (about 3 minutes) flip and cook the other side.  As they finish, remove and place on paper towel.  Just before serving, sprinkle each latke with a liberal amount of cotija cheese and scallions.  Finish with a pinch of fleur de sel.  In a small bowl, mix just a bit of white truffle oil with the ketchup (about a 1/4 teaspoon oil per 2-3 tablespoons of ketchup).  Serve the truffled ketchup with the latkes.


Thursday, November 29, 2012

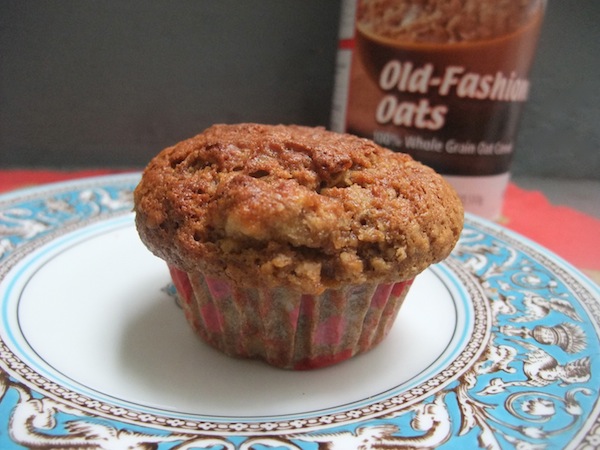
Banana Nut Oat Muffins Recipe


These Banana Nut Oat muffins are some of the best muffins I've ever made.I got out of the habit of baking when my stove was replaced. I use my bread machine and my Breville Smart Oven but it's too small for many things. Fortunately I have a muffin pan that makes 6 muffins that fits in it perfectly. And you know what? Making 6 muffins is much better than making a dozen! 

Muffins, like cupcakes are really good when they're fresh, but they get dry and stale quickly. So making smaller batches more frequently makes good sense. These muffins use lots of healthy ingredients like oatmeal, oat bran, bananas, walnuts and a little bit of olive oil so you can feel good about eating them. I used extra virgin olive oil because it's what I have on hand but you could use any olive oil you like. Olive oil is great for baking, especially in muffins and quick breads. The muffins are moist, with a little crunch from the nuts, a little chew from the oats, and have that buttery texture that comes from using bran, perfect to take when you're running out the door.

I adapted this recipe adding oat bran, increasing the amount of nuts and swapping out olive oil for melted butter but I'm not sure where the original recipe came from. It might seem like a lot of ingredients, but it comes together very quickly. The reason I used rolled oats, oat bran, bananas and walnuts is because they all contain magnesium. Many people are deficient in magnesium, over half the population in California according USDA research. But the combination is also really delicious, even if you don't need more magnesium in your diet. Just about everyone (unless those with nut allergies) can benefit from more nuts in their diet. Walnuts in particular have amazing heart healthy benefits.

Do you have a favorite walnut recipe? You could win fabulous prizes if your family recipe is chosen in the Gift of Gather contest. 

Banana Nut Oat Muffins
Makes 6 large muffins

Ingredients

2/3 cup all purpose flour
1/3 cup oat bran
1/2 cup old fashioned rolled oats
1/3 cup dark brown sugar, firmly packed
1/2 teaspoon baking soda
1/2 teaspoon baking powder
1/4 teaspoon salt
1 teaspoon cinnamon
3/4 cup mashed very ripe bananas (the skins should be brown)
1 egg
1/4 cup olive oil 
1 teaspoon vanilla
1/2 cup walnuts, chopped

Instructions

Preheat oven to 375 degrees. In a mixing bowl, stir together the flour, oat bran, oatmeal, sugar, baking powder, baking soda, salt and cinnamon. In another bowl, mix together the mashed bananas, eggs, oil and vanilla. Add the banana mixture and walnuts to the flour mixture, stirring with a rubber spatula or wooden spoon just until the dry ingredients are moistened. Do not over mix. 

Spoon batter into a well greased or paper-lined muffin pan (grese the top of the pan to make removing the muffins easier). Bake for about 20 minutes or until toothpick inserted into center muffin comes out clean. Let cool in the pan on a wire rack for 10 minutes. Remove muffins from the pan and let cool completely or better yet, eat warm.

Enjoy!


Whole Wheat Ricotta Waffles with Blueberry Sauce


Most little ones seem to have favorite toys or favorite stuffed animals.  And favorite colors.  But not our little guy Max.  He is rather fickle, dispensing his affection on whatever catches his fancy at the moment.  Or maybe he just kinda likes his toys, stuffed animals and colors equally.  But he does have a favorite letter.  Okay, 2 letters.  He loves both B and O.  And b is just so super awesome because it's also his word for berries.  And it doesn't hurt that b is the first letter of his very favorite thing in the entire world - buses.  Now, he loves all berries, but you never know what berry he will actually want to eat that day.  You see some raspberries on sale and pick up a few cartons, thinking, ohh Max will like this.  No, no, he will not.  He will want blackberries, not the raspberries sitting in the fridge.  But sometimes, sometimes, the stars align all beautifully straight in a row and the kiddie gods smile beatifically upon you and somehow you get the right berry (or B, as it is known) to make him happy.  And since it was his birthday the other day, I made him some waffles with B's.  And it must have been the right B, because he was shoveling the sauce into his mouth.  So thank you gods of toddler eating, we totally appreciate it.  And, I'd have to say these waffles are pretty great for full grown people as well.

Ingredients
Waffles:
2 cups white whole wheat flour
1 tablespoon sugar
2 teaspoons baking powder
1 teaspoon baking soda
1/2 teaspoon salt
1/4 teaspoon nutmeg
1/2 teaspoon cinnamon
1 cup ricotta
1 cup buttermilk
4 tablespoons unsalted butter, melted
2 teaspoons vanilla extract
4 eggs, separated

Blueberry Sauce:
1 pound blueberries
juice and zest of 1 lemon
1/4 cup maple syrup
1/4 cup water
1 tablespoon cornstarch
1 cinnamon stick
1/4-1/2 teaspoon ground clove (depending on how much you adore clove)

Instructions
Blueberry Sauce:  Place all ingredients in a medium pot over medium-low heat and gently boil, stirring often.  Let it cook together for about 5 minutes, and remove the cinnamon stick.  Let cool.

Waffles:  Beat the egg whites with a mixer until they hold soft peaks.  Whisk flour, sugar, baking powder, baking soda, salt, nutmeg, and cinnamon in a medium bowl.  In a large bowl, whisk ricota, buttermilk, butter, vanilla extract, and egg yolks.  Stir in the flour mixture. Gently fold in the egg whites.   Pour batter into preheated waffle iron and cook until waffles are crisp and golden.  I like keeping the oven hot at 350 and giving the waffles an extra round of crisping for a few minutes.  Pour sauce on top of waffles and serve.

Sunday, November 25, 2012

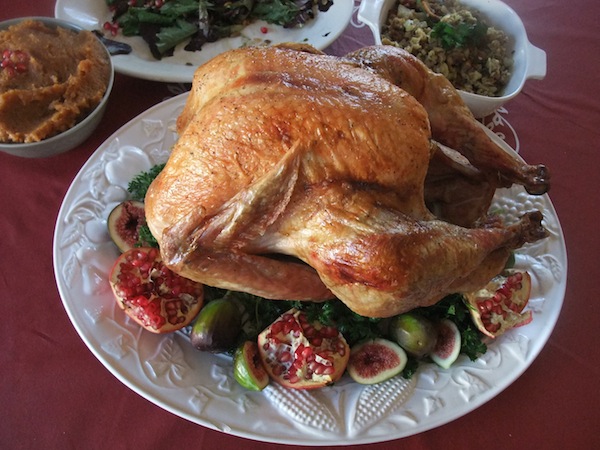
Leftover Turkey


Here is a favorite post from a couple of years ago--what to do with all that leftover turkey...

Leftover turkey, even dry, overcooked turkey, is good in soups, salads, sandwiches, stews, smothered in sauce or topped with a poached or fried egg.

Here are some suggestions for how to use leftover turkey. I've linked to recipes, some I've tried others just look good to me, but feel free to use your own or your imagination!


If you have any favorite turkey leftover recipes, please share them by leaving a comment.